Showing posts with label Knitting. Show all posts

Monday, October 4, 2010

All the rest of 'em

Here are some new and some old knitting images that just haven't made it up on the blog yet. If you like 'em, you can buy 'em!


Saturday, September 25, 2010

It's getting colder out...

which means I have knitting on the brain and the urge to create more designs. Here are my two latest:


Saturday, September 4, 2010

The Winners Are...

So, I thought I would give the gold, silver and bronze out to the top three selling designs this month. They are:


33 sales - gold Tote Bag

23 sales - silver Sigg Water Bottle 1.0L

19 sales - bronze White T-Shirt


You Might Be a Knitter If ...

I made these last night for my store, but since they are hard to see at the store (small images) I decided to post here for friends who were curious and asking. Any other suggestions to add? You can leave ideas in my comment box!


Tuesday, January 5, 2010

Buffalo Bills Knit Toque


I loved this bomber hat, but wanted to make it personal for a Buffalo Bills fan, so I added this motif (the pattern is on Ravelry) as the back flap.

My local knitting store had colours that matched the Bills colours fairly well, but they were a much smaller yarn width. So I adjusted the original pattern using ratios (also making it bigger to fit Uncle Lloyd's big head - his words, not mine!).
Here's the pattern:

kfb means knit 1 front and back (it’s an increase)

ssk means slip, slip knit stitches together (a decrease)


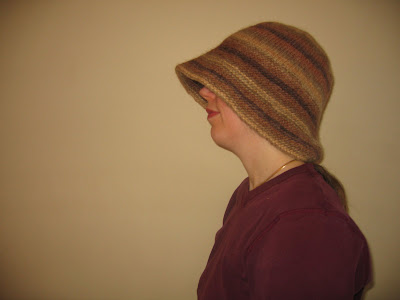
this hat is huge (fits my 25" head very comfortably).


Tools: US 7 DPN and 16” Circular or size to obtain gauge; stitch marker; tapestry needle


Gauge: 11 stitches and 14 rows = 2” square


Pattern:


Earflaps:

With two DPNs, CO 18st

row 1: k1, purl to last st, k1

row 2: k1, kfb, knit to last two sts, kfb, k1

repeat rows 1 and 2 until there are 30sts on the needle

next row: k1, purl to last st, k1

next row: knit across

Continue in this manner until piece measures 3.7in from cast-on edge

Leaving earflap on needle, cut a 12” tail of yarn.


Repeat for second earflap.


Hat:

With circular, CO 19sts, then, using the active yarn from your CO sts, knit the 30sts of the first earflap onto the circular. CO 39sts and then knit the 30sts of the second earflap onto the circular. CO 20sts – 138 sts total.

Being careful not to twist, place marker and join.

row 1: k9, p1, k9, p2tog, k26, p2tog, k9, p1, k9, p1, k9, p1, k9, p2tog, k26, p2tog, k9, p1, k9, p1 (134 sts)

row 2: k9, p1, k9, p1, k26, p1, k9, p1, k9, p1, k9, p1, k9, p1, k26, p1, k9, p1, k9, p1

Repeat row 2 until piece measures 7.5’ (?) from cast-on edge (11” (?) from earflap base) or desired length.


Begin decreases, switching to DPNs as needed:

(this is where the pattern gets confusing – there’s a lot of counting. but you’re just following the same purl pattern only you’re decreasing in a series of four rows: outer earflap/center segments, inner earflap, outer earflap/outer segments, inner earflap)


dec row 1: k2tog, k5, ssk, p1, k9, p1, k2tog, k22, ssk, p1, k9, p1, ssk, k5, k2tog, p1, k2tog, k5, ssk, p1, k9, p1, k2tog, k22, ssk, p1, k9, p1, ssk, k5, k2tog, p1 (122 sts)

dec row 2: k7, p1, k9, p1, k8, k2tog, k4, ssk, k8, p1, k9, p1, k7, p1, k7, p1, k9, p1, k8, k2tog, k4, ssk, k8, p1, k9, p1, k7, p1 (118 sts)

dec row 3: k7, p1, k2tog, k5, ssk, p1, k2tog, k18, ssk, p1, ssk, k5, k2tog, p1, k7, p1, k7, p1, k2tog, k5, ssk, p1, k2tog, k18, ssk, p1, ssk, k5, k2tog, p1, k7, p1 (106 sts)

dec row 4: k7, p1, k7, p1, k6, k2tog, k4, ssk, k6, p1, k7, p1, k7, p1, k7, p1, k7, p1, k6, k2tog, k4, ssk, k6, p1, k7, p1, k7, p1 (102 sts)

dec row 5: k2tog, k3, ssk, p1, k7, p1, k2tog, k14, ssk, p1, k7, p1, ssk, k3, k2tog, p1, k2tog, k3, ssk, p1, k7, p1, k2tog, k14, ssk, p1, ssk, k3, k2tog, p1, k7, p1 (90)

dec row 6: k5, p1, k7, p1, k4, k2tog, k4, ssk, k4, p1, k7, p1, k5, p1, k5, p1, k7, p1, k4, k2tog, k4, ssk, k4, p1, k5, p1, k7, p1 (86 sts)

dec row 7: k5, p1, k2tog, k3, ssk, p1, k2tog, k10, ssk, 1, ssk, k3, k2tog, p1, k5, p1, k5, p1, k2, k2tog, k3, ssk, p1, k2tog, , k10, ssk, p1, ssk, k3, k2tog, p1, k5, p1 (74 stitches)

dec row 8: k5, p1, k5, p1, k3, k2tog, k4, ssk, k2, p1, k5, p1, k5, p1, k5, p1, k5, p1, k2, k2tog, k4, ssk, k2, p1, k5, p1, k5, p1 (70 sts)

dec row 9: k2tog, k1, ssk, p1, k5, p1, k2tog, k6, ssk, p1, k5, p1, ssk, k1, k2tog, p1, k2tog, k1, ssk, p1, k5, p1, k2tog, k6, ssk, p1, ssk, k1 ,k2tog, p1, k5, p1 (58 sts)

dec row 10: k3, p1, k5, p1, k2tog, k4, ssk, p1, k5, p1, k3, p1, k3, p1, k5, p1, k2tog, k4, ssk, p1, k3, p1, k5, p1 (54 sts)

dec row 11: k3, p1, k2tog, k1, ssk, p1, k2tog, k2, ssk, p1, ssk, k3, k2tog, p1, k5, p1, k2tog, k1, ssk, p1, k2tog, k2, ssk, p1, ssk, k1, k2tog, p1, k5, p1 (42 sts)

dec row 12: k3, p1, k3, p1, k2tog, ssk, p1, k3, p1, k3, p1, k3, p1, k3, p1, k2tog, ssk, p1, k3, p1, k3, p1 (38 sts)


cut yarn and pull through rem stitches. Draw up tightly to fasten. Weave in ends.


Make flaps:

Pick up 39 sts along bottom edge between earflaps. Knitting first stitch of every row, knit in stockinette until flap measures desired length. BO knitwise on the WS. Weave in ends. Repeate for second flap. (The back flap has the buffalo motif knit into it.)

I-Cords: Pick up middle three stitches on one earflap. Knit a 10” I-cord. BO loosely and weave in ends. Repeat for second earflap.


The hat ended up being too big so I felted it:


Then I added a liner following this tutorial.

Friday, January 2, 2009

Cloche Flapper Hat Pattern - I love these hats from the 20s

Over the last few years I developed a love of women's fashion from the 1920s - specifically, cloche hats! Seriously, what's not to love about these??


I appreciate that the clothes from this era are feminine, yet practical and that's what I wanted in my next hat project - a truly warm hat that I could wear to church on Sunday or when I'm not wearing mommy-snow-pants-kind-of-clothes on my way to or from the school walking with the kids.

So, here is the final product!!


Since this was my first felting project, I did a test first.

This coffee cup cozy was knit from the same type of yarn (just a different colour) with the same size needles as the hat. I measured the height, width and the dimensions of the lovely purled "Ls" (my brother's initials) so I could compare the amount that the yarn would shrink for the purposes of my hat.


I used some grade 9 math to determine how much more knitting I should do to finish the hat for its height (I was past the brim at this point) and finished with a b-i-g hat.

Below you'll see the hat in three stages: prewashed, after one wash, and after a second wash.


I have the pattern half typed up from my hand scribbled notes, but since it's been a week or more since I last had the pattern and I'm now in the midst of a room reno project, I'm just going to post this now and add the pattern later if/when I find it!

I'm sure I'll make another one, probably of a solid colour, since it was easy and I LOVE that it fits my head perfectly (I've noticed most hat patterns for women are for a head circumference of 23 inches and I'm closer to 24 so hats often feel tight on me. Not this baby, though - it's perfect!)

UPDATE: here it is, 4 months later, for better or worse...

My Cloche 1920s Flapper Knit Hat

I worked this pattern out after looking at a bunch of different patterns online. My head is a circumference of 24 inches, which is larger than most women. Hats are always too tight on me, so that’s why I did this...

Used 10.5 circular needles and 10.5 DPNs at the end with Sean Sheep Armytage 100% wool (74 g - I think I used 2 balls with some left over with the second ball; Approx 108m/118yd; gage: 19 rows high, 14 stitches wide, 10 cm by 10 cm; 6.5 mm, 10.5 US, 3 UK)

Part A
Cast on 120 stitches
R1 knit
R2 purl
R3 knit
R4 purl
continue for 2.5 inches (end with a purled row)

Part B
After 2.5 inches:
R1 k2 tog, k58, k2 tog, k58 - 118 stitches
R2 purl
R3 k2 tog, k57, k2 tog, k57 - 116 stitches
R4 purl
R5 k2 tog, k56, k2 tog, k56 - 114 stitches
R6 purl
R7 k2 tog, k55, k2 tog, k55, - 112 stitches
R8 purl
R9 k2 tog, k54, k2 tog, k54 - 110 stitches
R10 purl
continue on in this manner for about 3.25 inches (so your hat will be 5.75 inches high at this point). For me that was when I got down to 100 stitches.

Part C
Switch to straight knitting and knit for 4 more inches.

Part D
Begin decreasing for the crown of the hat. The hat’s height for this decreasing section will be about 2.75 inches. So, assuming you have 100 stitches at this point...
R1 k8, k2 tog, k8, k2 tog, (repeat for a total of 10 sets of k8, k2 tog) - 90 stitches total
R2 knit
R3 you should have 90 stitches to start
k7, k2 tog, k7, k2 tog, (repeat for a total of 10 sets of k7, k2 tog)
R4 knit
R5 you should have 80 stitches to start
 k6, k2 tog, k6, k2 tog, (repeat for a total of 10 sets of k6, k2 tog)
R6 knit
continue on in this manner. Switch to DPN when it’s too irritating to continue with the circular needle. Assuming I did my math correctly (it’s actually been 4 months since I did this project and am now typing it up), you will get to the point where you have 30 stitches to start, so...
R16 k1, k2 tog, k1, k2, tog
R17 knit
R18 you should have 20 stitches to start
k2 tog, k2 tog, k2 tog, etc.
R19 you should have 10 stitches. Cut enough thread to be able to loop through these 
 stitches then knot, thread excess yarn inside the hat and cut whatever yarn
remains.

Weave in/secure any loose ends of thread (from your cast on, etc.) and cut.

The finished product should be 12.5 inches high and 17 inches wide at the bottom of the hat (which should be the widest part of the hat). Lay the hat flat to measure and measure the width (or diameter), NOT the circumference of the hat’s bottom.

I have a front loading washing machine, so the only way I can felt is to let the hat run through a whole cycle. Felt the hat in whatever way you normally do your felting. I used the short cycle on hot water and the strongest agitation setting. I set in inside a pillow case that was tied up at the top. It took 2 or 3 short washings, I believe, to get to where it fit just so. Because my machine spins everything so well, it wasn’t very wet at all and I wore it around to let it dry and form to my head.

***Note, I think next time in Part B I will switch every second row (the purl rows) to knit rows. The felting reduced attention away from the fact that the type of stitching switched at the point where I stopped decreasing and went to straight knitting, but it still shows more than I would like. I knit a long i-chord which I also felted and hand sewed to the hat at the point where the “flap” (bottom part of the hat) ends and the top of the hat starts and I would like, next time, for the knitting below that point to follow the k1 row, p1 row pattern and the knitting above that to be straight knitting.

I hope this makes sense - especially to me when I try to make another one next year with a new colour!!

:-)